Print technology has come along in leaps and bounds recently whether it be for the home, office, commercial, packaging or labels. As with all gains in technology it is simple to think that the accuracy of colour in print has also improved to the point that we can click and forget - it will be exactly as we see it, no need to worry!
Sure, we now all too often use our smart phone cameras to capture every moment and situation - it looks great on the phone screen - how hard can it be to reproduce that in print, with accurate colour? Well, there is going to be some translation involved as your image moves from capture to display to output.
Importantly these are all different devices that each have individual colour behavior. So, how can we maintain our vision of that captured photo to final output or ink on paper? Increasing our knowledge of colour management (CM) can enable us to control the process and trouble shoot.
The TOP 5 THINGS to Keep in Mind with Managing Colour
-
With printing your image (or document) there are multiple output engines in the reproduction chain.
Pictures captured digitally require 'translation' (rendering) of the contained data on each device - camera, display and printer. As stated above each of these handles that data differently - i.e. is it RGB or CMYK? Is it for input or output? What is the flow here?
Photo(s) taken with the 'camera', translated to the display on the camera or phone screen, copied to a computer, opened in image editing software, placed into a production document (think InDesign file), exported as a PDF and then to a production process for ink on paper. Of course, you could simplify that by just outputting a photo but usually it will still go from camera to computer (and display) to output device.
You want the final result to match the photo from your camera, right? Theoretically possible* with the correct 'adjustments' as the captured data is passed from device to device. *We say theoretically as there are limitations to the colour capability of each.
-
Reproduction of colour is a combination of a system and craft
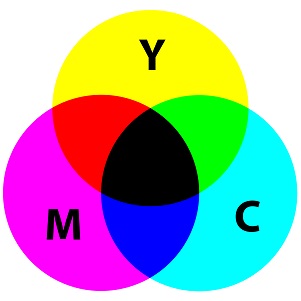
Let's think about colour - without light there is no colour. We print with Cyan, Magenta, Yellow and Black - Light reflects onto paper (or the substrate) and some of the light is absorbed (or subtracted) by the combination of Cyan, Magenta, Yellow and Black and what results is we see the reflected colour.
A phone, tablet or computer display (monitor and/or TV) is a RGB (Red, Green and Blue). It starts off black or blank and different amounts of RGB are added to show us an image on the display. The digital image on the display is built up from RGB pixels. RGB is additive colour and CMYK is subtractive - they are complete opposites. RGB devices are screens or displays, as well digital cameras and scanners. An output machine for ink on paper is usually CMYK, that can be blended and controlled.
For printing, when a photo is captured from a camera the RGB data is converted to CMYK data that the print engine can understand. The translation can yield horrible, unwanted colour if certain rules are not followed and adhered to.
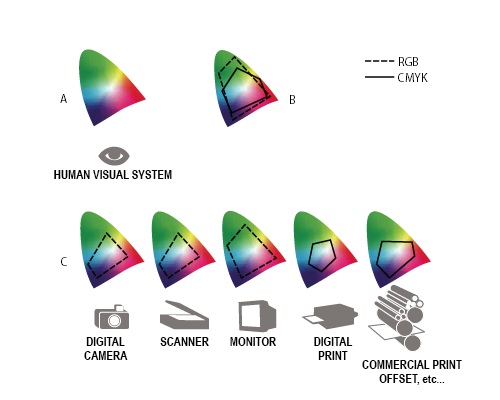
The key here is to realise that RGB devices have far greater or larger colour capabilities than CMYK. Some colours captured digitally in RGB and displayed on a monitor will not be able to be produced with complete accuracy in Cyan, Magenta, Yellow and Black - there is a limitation to what the Cyan, Magenta, Yellow and Black process can reproduce.
However, using the correct CM technique it is possible to output the best achievable Cyan, Magenta, Yellow and Black result from any RGB combination.

-
Translation from digital capture to a print space
Printing can still be considered a craft, but you can also argue that it is a service as printing companies are now seen as PSP's (print service providers) and no longer considered to be manufacturers. However, at any level printing still necessitates technical human competence, proficiency and skill.
When moving from digital to actual ink on paper there is quite a bit going on. There is liquid ink made up from pigments and other chemicals or maybe toner powders - either way there is an interaction between the ink and paper (or substrate). Paper itself varies hugely from uncoated bond you might have in your home or office output, to gloss, photo, fine art papers - the list is endless. The way the ink is laid down onto the paper causes a variety of results in the way they connect with each.
- Yes, it can be fairly easy to produce ink on paper, but to do it with predictability, accuracy and consistency requires some extra procedures.
-
Image resolution and print quality
Image resolution is described as DPI (Dots Per Inch) - this will not change when you send it to output as ink on paper - the original image will always be 300 DPI. A photo or picture at 300 DPI means there is 300 pixels per inch.
Digital production machines can output at various resolutions also described as DPI. But the key point here is the print resolution or DPI is controlling the machine behavior - higher DPI output will be slower and should produce more detail in the final result - only if there is more detail that can be extracted from the photo.
E.g. A 72 DPI photo will not look any better produced at 1200 DPI compared to being produced at 300 DPI. There not enough resolution and detail in the original photo at 72 DPI to show any improvement when outputting at a higher resolution.
For high quality photographs, it is best to make sure the image is at least 300 DPI at the final size you to produce at. i.e. You have an 8" x 10" photo with a resolution of 300 DPI - you can output this at the same size (8" x 10") or smaller (4" x 5") without a problem. However, if you wish to output it at 16" x 20" you will be 'scaling' the image at 200%, the DPI will drop to 150. This means the detail in the final result will be reduced and it will start to look 'pixelated'.
-
High quality ink on paper production is a multi-level process that requires technical human competence, proficiency and skill
 All digital print engines behave and output differently - there is a lot of mechanics going on inside these machines, especially with inkjet machines.
Print heads move at high speed with ink droplets 'sprayed' right onto the paper. Traditional printing like Offset has the image on a 'plate' that transfers the image to a blanket then onto the paper.
The output final process (digital inkjet, laser toner, offset, flexographic, etc.), the type of machine, the type inks, the type of paper (or substrates like polypro, plastic, metal, etc.) and other factors all have a direct influence on the final colour quality that can be achieved.
- No one likes to hear it, but every output process has some sort constraints and limits.
There have been major advancements with digital and wide format over the last 10 years producing huge signage and display production that we never saw before. Textile printing is moving very fast with home furnishings and fashion fabric designs being made with eye catching design and colour detail. At the same time high end graphics displays are able to show finer details and a broader range colour.
- A key point is that the RGB colour gamut exceeds that of CMYK.
Translate with ICC Profiles
To manage colour effectively from device to device we should use ICC profiles. An ICC profile gives meaning to the photos, files and devices we use - from capture to output. A profile describes the colour capabilities of the device it is associated with. i.e. digital image from a camera, the computer display, inkjet photo output, the offset process, etc. This means an image will look different on each device.
Using ICC profiles correctly enables us to view an RGB image on a monitor and simulate (soft proof) how it looks when produced on office laser output, on an inkjet photo machine or even in brochure we are having produced on an offset press. An ICC profile can be attached/embedded to individual images/files (RGB or CMYK) and even PDF's to describe their final output intent.
Where do I start?
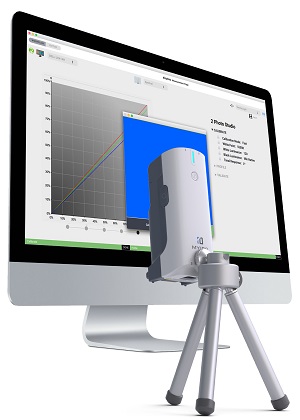
The first step is to calibrate your computer display - this will enable accurate image evaluation and editing. There are plenty of low-cost solutions for monitor calibration that will include a colorimeter or spectrophotometer and calibration/profiling software.
A favorite of mine is the Myiro-1 spectrophotometer that comes with monitor calibration software at no extra cost. Within the Myiro tools software the monitor calibration module is basICColor Display 6 - probably the best, easiest to use professional level software in its class.
Once your display is calibrated (and profiled) you can then view RGB or CMYK photos with confidence, perform editing, convert from RGB to CMYK and even soft proof your images. Your photo editing software must support ICC profiles to do this.
A computer display will change or drift over time so you will need to check and validate the colour periodically using the calibration hardware/software package. If it falls outside the desired tolerances, you will need to re-calibrate.
Software Application Set up
As stated above your software* for image editing, vector-based file creation and editing and page/document production all need to accept and be able to work with ICC profiles. This allows for effective CM throughout a design, production workflow. *(could be Photoshop, Illustrator, InDesign, Acrobat from Adobe, but there are other apps you can use as well). A CM workflow requires profiles with a clear description of a source and destination colour space.
Summary
Soft proofing is often a very underutilized tool in the production process. You can gain a lot by accurately soft proofing your images and production PDF's prior to sending to your type of output production or PSP (service provider).
Importantly, please understand that you will achieve a more accurate soft proof with properly calibrated monitor and using the correct CMYK profile. And with monitors you get what you pay for. You should not expect CM miracles from a laptop display, or a cheap computer display compared to a high-end graphics display like an EIZO CG series. Get help with display calibration here.
It can seem too daunting and complicated but going through each step in the workflow to set up CM correctly will end up saving you a lot of time and you will avoid disappointment with your final ink on paper result.
To find out more about printer colour calibration and print quality management please contact us at info@colourgraphicservices.com
